Securing Grafana with Pomerium
Grafana is an open-source analytics visualization and monitoring tool. It provides many user-contributed Dashboards that make it popular for enthusiasts as well as professionals.
This guide will demonstrate how to secure an instance of Grafana behind Pomerium, and provide users with a seamless login to Grafana using your Identity Provider (IdP).
Before You Begin
This guide begins with the following steps assumed complete:
- A running instance of Pomerium. If you haven't already installed Pomerium, see our articles for installation on Docker, Kubernetes, or as an all-in-one binary.
- Administrator access to a working Grafana instance, including write access to the config file
grafana.ini, usually found in/etc/grafana.
This guide uses the following temporary values in commands and configuration examples, which will need to be adjusted for your setup:
http://grafana:3000- The path Pomerium will use to access Grafana. This example emulates a common Docker-based setup.http://grafana.local:3000- The path to access the Grafana interface from your local computer. Depending on your desired configuration, you may need direct access to add at least one user before Pomerium is configured.https://grafana.localhost.pomerium.io- The path to access Grafana through Pomerium. Change this to match the domain space Pomerium is configured in.
Enable JWT Authentication in Grafana
Edit grafana.ini to configure JWT authentication. Replace auth.localhost.pomerium.io with the value of authenticate_service_url in your Pomerium configuration:
[auth]
signout_redirect_url = https://grafana.localhost.pomerium.io/.pomerium/sign_out ; signs users out of Pomerium when they sign out from Grafana
[auth.jwt]
enabled = true ;enables authentication by JWT
header_name = X-Pomerium-Jwt-Assertion ;defines the header to look at to provide the JWT
email_claim = email ;associates the email_claim in the JWT with the email of the Grafana user
jwk_set_url = https://auth.localhost.pomerium.io/.well-known/pomerium/jwks.json ;URL to the signing key to validate the JWT
cache_ttl = 60m ;sets a 60 minute cache time for the token
Once you've saved and exited the file, restart Grafana.
Add Users to Grafana
At this stage Grafana is configured to use the email claim in the JWT to associate an incoming connection with a user. Pomerium will be configured to include identity information via the JWT in the next section. But the user must still exist in Grafana to be associated. Otherwise, you will see this error in the browser after authenticating:
{"message":"User not found"}
Further down in this guide we'll go over Grafana's auto_sign_up option to create users as needed. But first we should create at least one user with administrator privileges. If you plan on administering Grafana through a direct connection to the service, you can skip this section.
To add users without requiring them to accept an invitation, log in to Grafana directly as an admin user at
http://grafana.local:3000.Under the shield icon in the main menu (Server Admin), select Users.
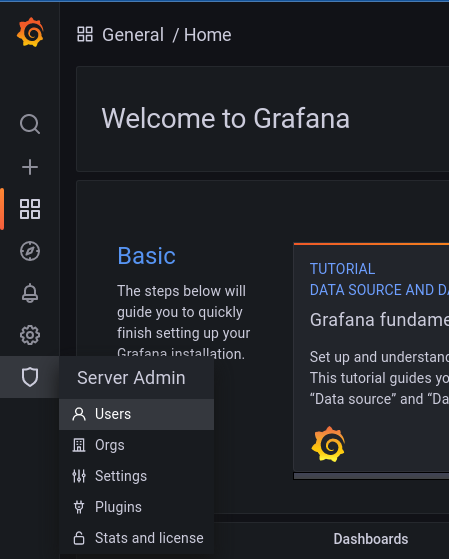
caution
This is distinct from the Users option under the cog wheel (Configuration), which will only finalize a new user when they accept an invite via email or link.
Click the New user button to create a new user. Make sure that the email address matches the one provided by Pomerium via your IdP.
tip
You can access the special endpoint
/.pomeriumfrom any Pomerium route to view the data provided by Pomerium in the JWT.
After creating a new user in Grafana, that user should be logged in automatically when they access Grafana from the Pomerium route (after first authenticating with your IdP, of course).
Configure the Pomerium Route
Add a route for Grafana to your Pomerium config. Change the following variables in the example below to match your setup:
| Variable | Description |
|---|---|
localhost.pomerium.io | The domain space where Pomerium is configured to set up routes. You can also change grafana to a custom subdomain. |
http://grafana:3000 | The hostname or IP address and port from which Grafana is accessible within your local network or container environment. |
example.com | Your company domain. The example policy allows access to Grafana for anyone with an email address from your company domain. Adjust the policy to match your organization's needs. |
- config.yaml
- Ingress
For all-in-one or split service configurations using config.yaml, add the route to your config.yaml file:
routes:
  - from: https://grafana.localhost.pomerium.io
    to: http://grafana:3000
    pass_identity_headers: true
    policy:
      - allow:
          or:
            - domain:
                is: example.com
Note
Docker-based installations may need to be restarted to pick up the new route.
If you're using the Pomerium Ingress Controller in Kubernetes, add an Ingress for the new route. Adjust the following example to match your configuration. Note that this example assumes a cert-manager solution for route certificates:
apiVersion: networking.k8s.io/v1
kind: Ingress
metadata:
  name: grafana
  annotations:
    cert-manager.io/issuer: pomerium-issuer
    ingress.pomerium.io/policy: '[{"allow":{"and":[{"domain":{"is":"example.com"}}]}}]'
    #ingress.pomerium.io/secure_upstream: true # Uncomment if Grafana is serving content over HTTPS
    ingress.pomerium.io/pass_identity_headers: "true"
spec:
  ingressClassName: pomerium
  rules:
  - host: grafana.localhost.pomerium.io
    http:
      paths:
      - path: /
        pathType: Prefix
        backend:
          service:
            name: grafana
            port:
              number: 3000
  tls:
  - hosts:
    - grafana.localhost.pomerium.io
    secretName: grafana.localhost.pomerium.io-tls
Once the new route is applied, users can access Grafana from https://grafana.localhost.pomerium.io
Manage Access at Scale
Note
Ensure that Grafana is up to date to take advantage of auto_sign_up, as it is only available for JWT as of version 8.4.0.
The steps outlined above work to confirm the configuration for small teams, but adding users individually and manually does not scale for larger organizations. To add users to Grafana at scale, you can use the Grafana's auto_sign_upconfiguration to auto-signup users as they log in:
[auth]
signout_redirect_url = https://grafana.localhost.pomerium.io/.pomerium/sign_out
[auth.jwt]
enabled = true
header_name = X-Pomerium-Jwt-Assertion
email_claim = email
jwk_set_url = https://auth.localhost.pomerium.io/.well-known/pomerium/jwks.json
cache_ttl = 60m
username_claim = sub ;sets the username to the value of the "sub" claim
auto_sign_up = true ;sets the login to automatically create a new user if one doesn't exist
[users]
auto_assign_org = true ;auto assigns the user to the existing default organization
auto_assign_org_role = Editor ;auto assigns the user the "Editor" role
Note that the value of auto_assign_org_role could also be "Admin" or "Viewer".
This will automatically create a user with their email and username populated. To have the "Name" field populated for users, you can set the jwt_claims_headers option in Pomerium to include name in the JWT payload:
- config.yaml
- Environment Variable
- Pomerium Ingress Controller
jwt_claims_headers: name
JWT_CLAIMS_HEADERS=name
extraEnv:
  JWT_CLAIMS_HEADERS: name
This configuration will allow seamless authentication and authorization without any additional toil for your team.
Tip for Google Users
When using Google as an IdP, the user field is populated by a numeric value that you can not configure. Note that Grafana can accept the name field as a username, including spaces:
username_claim = name
Troubleshooting
Local Signing Key
In instances where Grafana cannot get the signing key for the JWTs from the Pomerium authenticate service, you can place a copy of the key locally.
For example, wildcard certificates signed by LetsEncrypt may still be cross-signed by the expired DST R3 root. While many browsers still trust these certificates (as long as they are also signed by a valid root), some applications reject them, including Grafana:
logger=context error=Get "https://authenticate.localhost.pomerium.io/.well-known/pomerium/jwks.json": x509: certificate signed by unknown authority
To circumvent this issue, you can use curl or wget to download the signing key locally:
- curl
- wget
From the Grafana host:
curl https://authenticate.localhost.pomerium.io/.well-known/pomerium/jwks.json > /etc/grafana/jwks.json
From the Grafana host:
wget -O /etc/grafana/jwks.json https://authenticate.localhost.pomerium.io/.well-known/pomerium/jwks.json
Edit grafana.ini and add the jwk_set_file key to provide it to Grafana:
[auth.jwt]
enabled = true
header_name = X-Pomerium-Jwt-Assertion
email_claim = email
jwk_set_file = /etc/grafana/jwks.json
cache_ttl = 60m